 Cookie preferences

EU has decided to implement a 3 EUR Customs Duty fee on low-value parcels imported from outside EU. Here are the...
Latest posts
-
 Changes in EU customs rules from 1st July 2026Read more
 -
 Transition to 15-minute pricing in the European electricity marketRead more
A significant change is due to be implemented in 2025 in the European electricity market: Prices will be set per...
-
 Assumed bug on Aidon meters with HAN-NVE interfaceRead more
We assume this is a bug on Aidon smart meters with HAN-NVE interface (Norway, Sweden and possibly Finland).
-
") Kamstrup Omnipower scale errors on some parameters (known to happen in Sweden and Denmark)Read more
Kamstrup Omnipower scale errors on some parameters (known to happen in Sweden and Denmark)Read moreSome grid companies have increased the number of decimals on some parameters, here is how to update your device.
-
 Updating device over USB cable, simplified methodRead more
Some users experience difficulties using one of the Over-the-air (OTA) methods for firmware upgrade. We propose a...
-
 Kamstrup Omnipower HAN port not workingRead more
How to cure the Kamstrup Omnipower meter hick-up (meter stops pushing data)
-
 Kamstrup Omnipower meters in Sweden: Which configuration should you choose?Read more
Swedish grid companies are moving from "HAN-NVE" configuration to "P1" configuration. Some grid companies allow their...
-
 L2 current not available!?Read more
Some users have noticed that the device is no longer reporting current on phase L2.
-
 Swedish customers and PostNord as "Tullombud"Read more
Swedish customers receiving our shipments via Postnord are mislead to think they have to pay customs fee and VAT....
-
 One-click upgrade is not workingRead more
One-click firmware upgrade works just fine for most users - but what to do if it fails?
Blog categories
Search in blog
Archived posts
How do I fix a bricked device?
You will need the following installed on your computer:
- You need Python installed
- Installation of esptool.py and other python programs are simplified by also installing pip
-
Install esptool.py, which is a Python program. The simplest way to install it is to open a command window and enter: pip install esptool
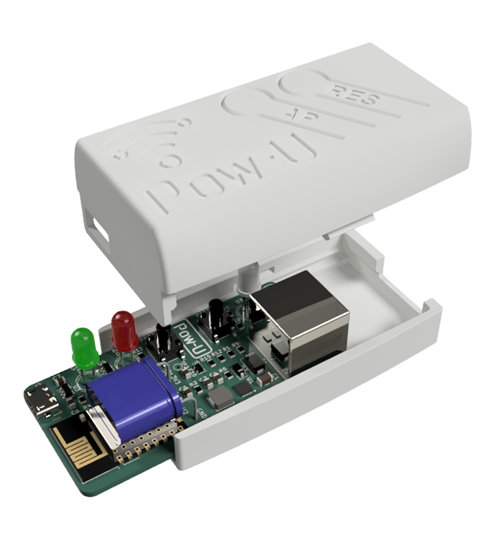
Pow-K+ (ESP32-S2 microcontroller)
You're lucky - this is an easy one!
The Pow-K+ can be reprogrammed from a PC using the micro USB port at the back of the board:
How to reprogram the board
- Remove the Pow-K+ from your power meter
- Connect a micro-USB cable between your computer and the board
- Wait a minute or so to charge the super capacitor (no worries; nothing wrong will happen if you're too impatient).
- Press and hold the AP/Prog button while you press and release the RESET button. The board is now ready to receive firmware upload. This will open a COM port on your computer.
- If you're on Windows, open Device Manager to identify which COM port is opened. Note it down; you'll need it later. If you're on a mac... well, I have no idea, but I assume you'll be able to google it. :-)
- Download the latest revision firmware files from Github. The processor on Pow-K+ is an ESP32-S2, be sure to select the right files.
- Open a command window and go to the folder containing the downloaded files.
- Enter the following command, replacing "COM3" with the COM port you found in point 5
esptool.py --chip esp32s2 --port COM3 --baud 460800 --before default_reset --after hard_reset write_flash -z --flash_mode dio --flash_freq 40m --flash_size detect 0xe000 boot_app0.bin 0x1000 bootloader_qio_40m.bin 0x8000 partitions.bin 0x10000 firmware.bin - If all is well, you'll see the upload progress in the command window.
- If you get an error message, retry point 4, and/or recheck that you are on the right COM port.
- When upload is completed, press RESET to reboot the board
- Press and hold the AP button for 5 seconds
- Follow the instructions in Firmware User Manual to configure your board.
Pow-K or Pow-U (ESP8266 microcontroller)
You will need an FTDI-module, for instance this one: https://www.kjell.com/no/produkter/elektro-og-verktoy/arduino/moduler/luxorparts-usb-til-seriell-adapter-for-arduino-p88064

Power the board before powering the FTDI module. Connecting a powered FTDI module to an unpowered board may destroy your board.
- Pow-U is powered by the micro USB connector.
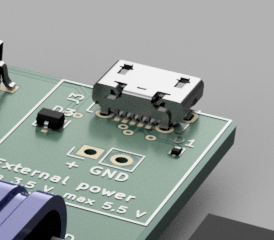
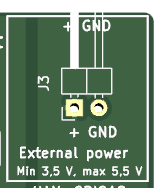
- Pow-K is powered by providing 5V to the board on its power port:
Ensure the FTDI module is set to 3,3V (usually by a jumper). Having it set to 5V may destroy your board.
Your board has holes where the pins of the FTDI-module can be plugged in. The holes are arranged in zig-zag, so you will get a good connection without soldering in a connector.

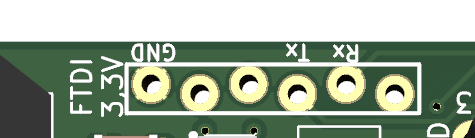
The marking on the PCB (GND, Rx, Tx) is for the FTDI-module:
- Rx on FTDI to Rx on the board
- Tx on FTDI to Tx on the board
- GND on FTDI to GND on the board
- (The remaining lines on the FTDI module are not used)
Programming procedure:
- Connect the FTDI-module to your computer
- If you're on Windows, open Device Manager to identify which COM port is opened. Note it down; you'll need it later. If you're on a mac... well, I have no idea, but I assume you'll be able to google it. :-)
- Press and hold the AP/Prog button while you press and release the RESET button. The board is now ready to receive firmware upload.
- Download the latest revision firmware files from Github. The processor on these boards is an ESP8266, be sure to select the right file.
- Open a command window and go to the folder containing the downloaded file.
- Enter the following command, replacing "COM3" with the COM port you found in point 2
esptool.py --chip esp8266 --port <port> --baud 115200 --before default_reset --after hard_reset write_flash 0x0 firmware.bin - If all is well, you'll see the upload progress in the command window.
- If you get an error message, retry point 3, and/or recheck that you are on the right COM port.
- When upload is completed, press RESET to reboot the board
- Press and hold the AP button for 5 seconds
- Follow the instructions in Firmware User Manual to configure your board.
Posted in:
FAQ
Related posts
-
 Can Pow-U and Pow-K show energy produced from solar panels or wind turbines?
Especially solar panel installations are starting to become common, so we want to monitor power and energy from them!Read more
Can Pow-U and Pow-K show energy produced from solar panels or wind turbines?
Especially solar panel installations are starting to become common, so we want to monitor power and energy from them!Read more -
 How can I read data from my Pow-K / Pow-U when I'm not at home?
Many of us do not like the idea of sending our power consumption data to some cloud service where we do not really...Read more
How can I read data from my Pow-K / Pow-U when I'm not at home?
Many of us do not like the idea of sending our power consumption data to some cloud service where we do not really...Read more -
 Pow-U: Can the external power be connected while Pow-U is connected to the meter?
In some use situations, the Pow-U will have difficulties maintaining its voltage level and will reset frequently (see...Read more
Pow-U: Can the external power be connected while Pow-U is connected to the meter?
In some use situations, the Pow-U will have difficulties maintaining its voltage level and will reset frequently (see...Read more -
 Emergency factory reset
Your device has become unresponsive for some reason. Is there some way to recover? Yes!Read more
Emergency factory reset
Your device has become unresponsive for some reason. Is there some way to recover? Yes!Read more -
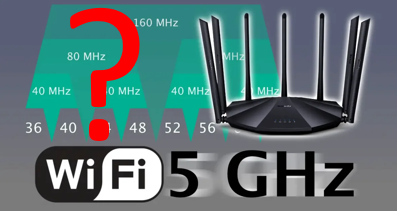 Can my device connect to 5 GHz Wifi?
Sorry - the answer is No.Read more
Can my device connect to 5 GHz Wifi?
Sorry - the answer is No.Read more
Leave a comment